On the Flex side, I’ve been using RobotLegs for a while, and really started to appreciate the eventBus oriented architecture. Now, when trying out GWT, I want to do the same here. The search for suitable solution has led me to Mvp4g (http://code.google.com/p/mvp4g/). As always, the very best way of really getting the grips is trying to explain to others… So, here’s the first part of some very basic tutorials on how to use the Mvp4g framework.
Creating the project Mvp4gEx1
Create a new GWT Web Application Project in Eclipse, give it the project name Mvp4gEx1, use a package path of your liking (in this tutorial we use ex as a minimalistic root package), and make sure to uncheck the Use Google App Engine checkbox.
Testrun the example (using F11) to make sure that it compiles and runs in hosted mode as expected.
Mvp4g dependencies
To get us up and running, we need some library jars.
Here I use the following:
- commons-configuration-1.6.jar
- commons-lang-2.5.jar
- aopalliance.jar
- gin-1.0.jar
- guice-2.0.jar
- mvp4g-1.2.0.jar
Have a look at http://code.google.com/p/mvp4g/wiki/HowtoIntegrateMvp4g for information on where to download these libraries.
Create a lib folder at the root of your project, and put the above jars in that folder.
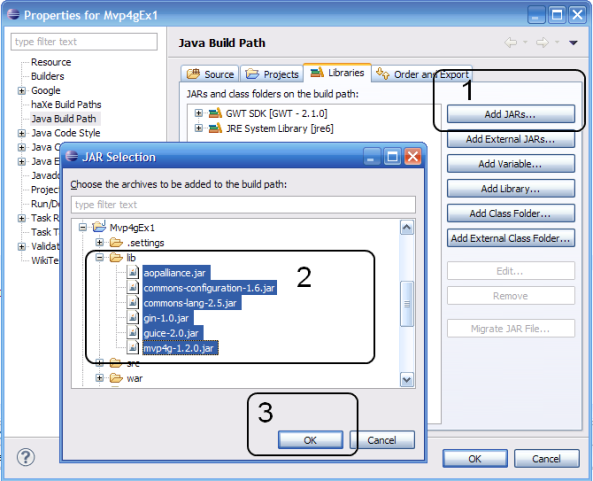
Now, we have to make sure that these jars are included in our project build path. Rightclick on your project root, and use the Properties menu alternative to open the project properties dialog box. Select the alternative Java Build Path, and select the tab Libraries.
- Press the button Add JARs…
- Navigate to the Mvp4gEx1 > lib folder, and select the jars
- Press the OK button
So, now we have those jars included in our project.
Before we can use them (or – actually – Mvp4g can use them, we don’t!) we have to make some changes in our gwt module definition xml. Open Mvp4gJson.gwt.xml, located in your package root. Make sure to to the following changes:
- ADD <inherits name=’com.mvp4g.Mvp4gModule’/> under the Other module inherits comment.
This gives us access to the Mvp4g classes. - CHANGE the entry point tag to <entry-point class=’com.mvp4g.client.Mvp4gEntryPoint’/>
This will replace the normal GWT entry point class with a mvp4g-specific one that we will create in a minute.
The complete Mvp4gEx1.gwt.xml will look something like this:
<?xml version="1.0" encoding="UTF-8"?>
<module rename-to='mvp4gex1'>
  <!-- Inherit the core Web Toolkit stuff.                        -->
  <inherits name='com.google.gwt.user.User'/>

  <!-- Inherit the default GWT style sheet.  You can change       -->
  <!-- the theme of your GWT application by uncommenting          -->
  <!-- any one of the following lines.                            -->
  <inherits name='com.google.gwt.user.theme.standard.Standard'/>
  <!-- <inherits name='com.google.gwt.user.theme.chrome.Chrome'/> -->
  <!-- <inherits name='com.google.gwt.user.theme.dark.Dark'/>     -->

  <!-- Other module inherits                                      -->
  <inherits name='com.mvp4g.Mvp4gModule'/>

  <!-- Specify the app entry point class.                         -->
  <entry-point class='com.mvp4g.client.Mvp4gEntryPoint'/>

</module>
Please note: There are two ways of implementing the eventbus:
- as application entry point (the method used here), and
- invoked from the GWT standard entry point class. Here’s more info about this.
Creating the event bus
The Mvp4g architecture is built around an eventbus. It acts like a command central, that ties together all other parts of the application. The point is, that these other parts doesn’t have to know of each other, they can act independently in a loose coupled manner. Wich in turn is what we’re after to build testable, maintainable and scaleable solutions.
The eventbus is so essential that it acts as the entry-point for our application (replacing the GWT-normal EntryPoint-inherited class).
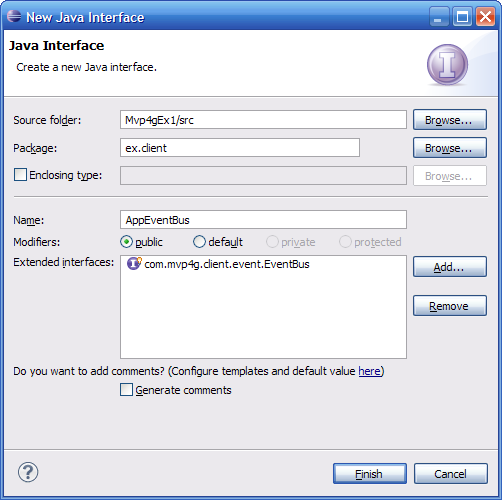
So let’s create one. In your package.client, create an AppEventBus interface extending the mvp4g EventBus interface:
This event bus is going to serve as our application entrypoint, and since we need a way to connecting link with the browser/html, we are soon going to create a RootView with a corresponding RootPresenter to give us this connection.
Here we can see the code for our minimalistic AppEventBus, with the @Event(startView = RootView.class) annotation telling the Mvp4g system what class to use as our main start view:
// ex.client.AppEventBus.java
package ex.client;

import com.mvp4g.client.annotation.Events;
import com.mvp4g.client.event.EventBus;

@Events( startView = RootView.class )
public interface AppEventBus extends EventBus {
	// No events to handle yet...
}
RootView and RootPresenter
Our RootView, wich will hold our basic UI controls, will inherit from Composite:
// ex.client.RootView.java
package ex.client;

import com.google.gwt.user.client.ui.Button;
import com.google.gwt.user.client.ui.Composite;
import com.google.gwt.user.client.ui.HorizontalPanel;
import com.google.gwt.user.client.ui.Label;
import com.google.gwt.user.client.ui.TextBox;

public class RootView extends Composite {
 private Button button = new Button("Button");
 private TextBox textbox = new TextBox();
 private Label label = new Label("Label");
 private HorizontalPanel horizontalPanel = new HorizontalPanel();

 public RootView () {
 this.horizontalPanel.add(button);
 this.horizontalPanel.add(textbox);
 this.horizontalPanel.add(label);
 initWidget(this.horizontalPanel);
 }
}
Please note that this view is a stupid one — no button click handling, no connection to the outer world. This is the way it’s supposed to be in this type of loose coupled architecture.
The RootView needs a RootPresenter that acts like a bridge between the ui (RootView) and the rest of the application (via the AppEventBus). The RootPresenter will inherit from BasePresenter:
// ex.client.RootPresenter.java
package ex.client;

import com.mvp4g.client.annotation.Presenter;
import com.mvp4g.client.presenter.BasePresenter;

@Presenter( view = RootView.class )
public class RootPresenter extends BasePresenter {

}
Please note that the BasePresenter class needs two type arguments: view and event bus:
public class RootPresenter extends BasePresenter<RootView, AppEventBus> {
Also note the @Presenter annotation that tells the mvp4g system what view this class is serving.
Time for some action!
So, now we have a stupid view, a dead presenter and an empty event bus. Great! Now, with our fancy UI (a button, a textbox and a label), we will try to accomplish the following: When the user presses the button, the text written in the textbox will be copied into the label.
There are three ways of handling this “data status change”:
- Putting the logic into the view, by adding a clickhandler to the button.
Completely simple, quick and un-fancy! It works here, but not if 20 views and models are depending on the same data. Then we will soon get dependency spaghetti hell that Mvp4g is built to help us aviod.
(Code example 1 below) - Putting the logic into the presenter, by registering the clickhandler there and taking care of the logic. This can be done because the mvp4g system has injected the view into the presenter, so we can access it easily.
Only a fraction better than the solution above. At least we are handling data change in a class that’s created for this kind of things – wich the view clearly isn’t. It’s also an important step towards doing it the “right way” below.
(Code example 2 below) - Dispatch our data status change to the eventbus, and letting anyone depending on the data change taking care of it. This means that we tell the application event bus: “Hey, some data has changed”. At the same time we are handling over the responsibility to take this information further to the event bus. It will broadcast it to the presenters (or EventHandler classes – subject for next tutorial) that are registered to care.
So, lets have a look at some code:
Code example 1: Logic in the view. Have a quick look, and forget it:
public RootView () {
 this.horizontalPanel.add(button);
 this.horizontalPanel.add(textbox);
 this.horizontalPanel.add(label);
 initWidget(this.horizontalPanel);
 // code below added...
 button.addClickHandler(new ClickHandler() {
 public void onClick(ClickEvent event) {
 label.setText(textbox.getText());

 }
 });
 }
Code example 2: Logic in the presenter – possible via dependency injection, as the view (RootView) is injected in the presenter, and accessible via the protected property view.
We create the click handler in the overridden bind() method, wich is invoked when the presenter is activated.
@Presenter( view = RootView.class )
public class RootPresenter extends BasePresenter {
 public void bind() {
 view.button.addClickHandler(new ClickHandler() {
 public void onClick(ClickEvent event) {
 view.label.setText(view.textbox.getText());
 }
 });
 }
}
Code example 3: Using the event bus to notify the application about our data change.
First, let’s create a event bus method that we can call from our presenter. As we are dealing with textbox text change, we call our eventbus method “textChange”:
@Events(startView = RootView.class)public interface AppEventBus extends EventBus { @Event(handlers = {}) public void textChange(String newText);}
Now, we can call this eventbus method from our presenter, like this:
view.button.addClickHandler(new ClickHandler() {
 public void onClick(ClickEvent event) {
 //view.label.setText(view.textbox.getText()); // <-- Replace this...
 eventBus.textChange(view.textbox.getText());  // <-- with this...
 }
 });
The eventbus is now recieveing information about our data change, but there it stops because no one’s listening!
We need to register one or many recepients for the event information. Right now, we just have one actor – the RootPresenter – so this guy will now act not only as a broadcaster, but also as a reciever…
First, let’s register the RootPresenter as a listener to the textChange event:
public interface AppEventBus extends EventBus {

 @Event(handlers = {RootPresenter.class}) // <-- RootPresenter added here!
 public void textChange(String newText);

}
Next step is to add a handler for our event method. This is done by adding “on” in the beginning of the method name.
Thus, the event bus method textChange needs a presenter handler called onTextChange. Let’s say we have a event bus method named loginStatusChange — this would need a presenter handler called onLoginStatusChange etc.
The RootPresenter with onTextChange handler added, and some code to update the view label, will look like this:
@Presenter( view = RootView.class )
public class RootPresenter extends BasePresenter {
 public void bind() {
 view.button.addClickHandler(new ClickHandler() {
 public void onClick(ClickEvent event) {
 //view.label.setText(view.textbox.getText()); // <-- Replace this...
 eventBus.textChange(view.textbox.getText());  // <-- with this...
 }
 });
 }

 public void onTextChange(String newText) {  // this method recieves the eventbus textChange event
 view.label.setText(newText);
 }
}
So, now we’ve completed the data roundtrip. No real benefits this far, of course, but let’s just say that we had three or thirty different views that should be updated instead of one. All we have to do is to create the view/presenter pair, and register the presenter as a listener to the event in focus. We wouldn’t add any tight coupling but to the event bus itself, other parts would still act independently.


CTRK
January 6, 2011
Hi
First thank you very much for tutorial….
I am getting error telling the ui fileds(button, textfield & label) from RootView in my RootPresenter class.
Thanks…
CTRK
Sam
January 18, 2011
Thank you so much, I am kind of new to UI development, This tutorial is very very useful for me.
Is there any part2 ?
cambiatablog
January 18, 2011
Maybe later. But don’t hold your breath, I’m very busy with other things right now…
Dhruv
April 4, 2011
Correct two things before compliling:-
1. Make the fields of RootView Class as Public.
2. When using EventBus, Change the Give the RootView and EventBus Class as the parameter in RootPresenter Class.
As:-
public class RootPresenter extends BasePresenter
Patrick Jackson
August 4, 2011
+/-Thanks for the tutorial! It has helped clear some things up for me. Please do part 2!
Ilja
September 29, 2011
Thank you very much for this tutorial! It much more clear than Wiki on the Mvp4g’s page.
Chris Jansen
January 24, 2012
^ Agreed! Very clear and easy to read.
Umamaheswar Reddy
April 30, 2012
Thanks for this tutorial, please let me know if there is any part2.